Digital Menu Board Editor
Pick from tons of pre-built and categorized templates or design your own with our easy-to-use menu board editor. Instantly publish updates and keep your customers coming back for more, boosting your sales with every new publish.


Digital Menu Board Editor
Digital Menu Boards Templates
Why You'll Love Our Digital Menu Board Editor
Say goodbye to boring menus and hello to beautiful, high-impact displays, without the hassle.
- 🌟 Choose from a variety of stunning, professionally designed templates that are both eye-catching and practical.
- ⚡ Set up your digital menu board in just minutes—no design skills needed.
- 🎨 Want something custom? Easily create your own menu layout with our intuitive editor.
- 💻 Make updates anytime, from anywhere—right from your laptop or PC.
- 🚀 Changes go live instantly, so your menu is always up to date.
Steps to publish menu on TV Screen?
Head over to the App Store section within your DotSignage Panel. (New to DotSignage? Sign up for a free trial!)
Select the Digital Menu Board.
Click the Create Digital Menu Board button, usually found in the top right corner.
Give your new menu a descriptive name.
Browse our library of customizable menu templates. Click on any template to begin editing.
You can also easily filter templates by restaurant type (e.g., pizza, burger, offers, deli) to find the perfect starting point.
Guide to Customizing Menu Boards
1. Choose Your Screen Orientation
Start by selecting your preferred screen layout—Portrait or Landscape.
2. Set Your Background
Tap on the ‘Background’ option to customize your board. Here, you can:
- Choose a background color or background image.
- Pick from the preloaded background images, or tap ‘Code’ to set a specific color using a hex code or color picker.
- Use ‘Clear’ to remove the current background if you want to start fresh.
3. How to Add Menu
When you tap on ‘Add Menu’, a text box labeled ‘Item Name’ will appear. Double-tap the box to begin adding items through the Menu Property pop-up.
To add more items, tap the + button in the pop-up.
Next to the + button, you’ll see a dropdown with options like 1x, 2x, etc.
- 1x means a single size for the item.
- 2x and above allow you to set multiple sizes (e.g., Small, Medium, Large, Extra Large) as needed.
Mark the item as ‘Our of Stock’ by ticking on the provided box if needed.
3.1 Tap on ‘Customization’ to format the menu layout.
You can customize:
- Menu heading – This is applicable for the item names in the menu.
- Description – This is applicable for the item descriptions in the menu.
- Price heading – This is applicable for the the sizes (eg: small, medium, large) for menu items if applicable.
- Price – This is applicable for the prices of the menu items.
3.2 You can adjust the font style, size, and color, and apply formatting effects Like:
- Background color for the text
- Curved corners using the Curvature option
- Stroke effect, which adds an outline to the text background — including control over stroke width
Additionally, you can manage the spacing between menu items and their prices to create a cleaner layout.
4. How to Add Text:
Want to highlight an offer, add a category heading, or include decorative text? Simply tap ‘Add Text’ to get started.
Once added, double-tap on ‘Some text here’ to access all the formatting options.
In the pop-up editor, you can:
- Enter your desired text
- Choose the font style, size, color, and alignment
- Tap ‘Fill Color’ to add a background color to your text
- Use the ‘Curvature’ option to create a rounded, polished background effect
- Select ‘Shadow’ to give your text depth and a stylish look
- Apply Bold, Underline, or Italic effects using the respective icons
5. Image Layering Options
‘Bring to Front’ places the selected image on the top-most layer, making it appear above all other elements.
‘Send to Back’ moves the image to the bottom-most layer, placing it behind everything else.
‘Move Up’ and ‘Move Down’ let you adjust the image’s position one layer at a time.
For example, if you have five overlapping images, tapping ‘Move Up’ will shift the selected image up by one layer. Tapping it again will move it up another layer, and so on.
‘Move Down’ works the same way, but moves the image one layer lower with each tap.
6. Stock Images, Shapes & Icons
You can add images to your design, including food items, side dishes, commonly used design elements, vector shapes, and standard icons.
To use your own images, simply click the ‘Uploads’ button to browse and use them from the media files on your PC or laptop.
Shapes, text, and icons come with formatting options such as:
- Fill color – Lets you decide the outline color of the vector
- Stroke – Lets you decide the outline width for the shape or vector
- Opacity – It allows you to determine the transparency of the object
- Shadow – Allows you to add a shadow effect to the vector or image
Your can try and test these options to get the shapes and vectors based on your preference.
Get access of 30+ Digital Signage Apps!
Transparent Pricing, No Hidden fees!

How we are different?
The price you pay to get access to Digital Menu Boards is best in the market for the wide range of features and convenience that you get for this system.
The support team at DotSignage is all at your service to answer all the questions/queries you may have and assist you in the best use of the solution we offer.
The system is designed keeping simplicity and straightforwardness in mind such that users can understand and use it with less guidance.
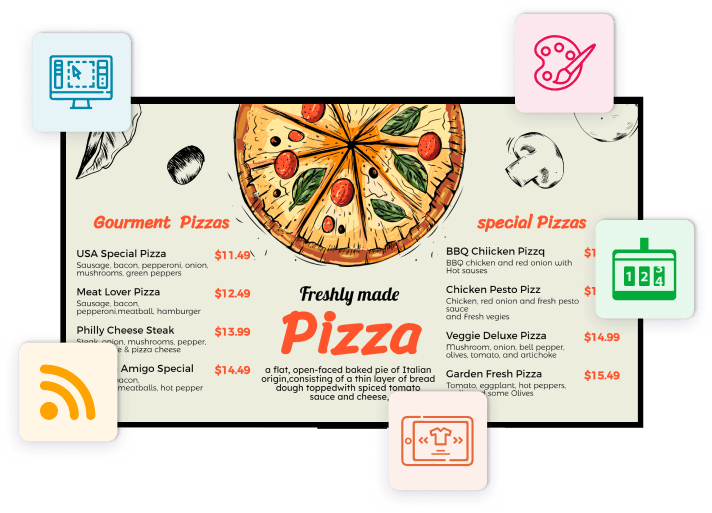
With so many customisable templates to choose from, restaurants need not worry about their menus. They could simply choose one, edit them as needed with a drag and drop editor and get started.